How to add a Whatsapp chat button in Blogspot and WordPress.
Add a Whatsapp chat button in Blogspot & WordPress and collect leads
Hey guys, Welcome to A+ bloggers. Today we are going to learn how to add a free Whatsapp chat button to your website. You can keep yourself in touch with your customers or potential buyers through this button and can generate useful leads with this Whatsapp chat button.
But let's first discuss in detail the advantages of using this chat button.
See also: Blogger SEO settings.
Benefits of the WhatsApp chat button.
WhatsApp chat button is a useful tool for your website, especially for an e-commerce store. Here I have enlisted some of the benefits of the WhatsApp chat button.
1. It gives your clients a chance to easily contact you.
2. They don't have to spend their time finding your contact details as this button is always easily accessible.
3. It can help you get the phone numbers of your clients or potential buyers. So, you can easily retarget them later and can keep them updated about your new product, services or promotions.
4. It can help you increase your conversions
So these were the few benefits of the WhatsApp chat button to read more you can go here. And now it's time to add a beautiful and easily accessible WhatsApp chat button to your website. So let's get started.
Create a WhatsApp chat button
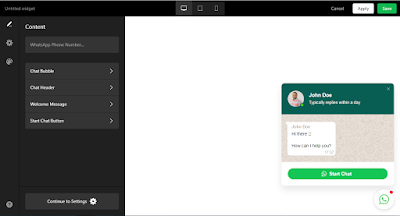
1. So now I want you to go to elfsight and sign up for an account.
2. It will bring you to a dashboard.
3. From the applications menu choose the "Whatsapp chat" button.
4. Choose any appropriate template you like to continue with.
5. Now enter your WhatsApp phone number in the given blank.
6.Now in the chat header settings replace the custom pic with your pic and the custom name with your name.
7. There are many other settings available like which days you want to show chat and how many times to a single people.
8. So, leave these settings as default or made changes according to your requirements.
9. Now, click add to website button.
10. Now it will open 4 packages for you for the widget.
11. I usually recommend choosing a pro plan of $10 per month but you can choose a lite plan to try the widget for free on your website up to 200 views.
12. And after choosing a plan they will give you a code.
13. You will have to put this code in the HTML of each page you want to display the button on. Simply switch to HTML view in WordPress or Blogspot and put the code at the end of HTML and boom you have successfully installed a chat button like this on your website. You can also ask the elfsight's team to help and once you subscribe for a premium plan, they will automatically add the button for you on your website.
So this is the end of the article and I hope that after reading this article you will be able to add a WhatsApp chat button to your website...
I also hope that after adding this button, you will see an increase in your sales.
And finally, if you like the post don't forget to share the post as sharing is caring.
Learn about: Starting your own free blog.
Author: Huzaifa Azhar
Disclaimer:
" The post contains affiliate links and we may receive an affiliate commission for any purchases or actions made by you on the affiliate website using our affiliate link but it will not cost you even a penny more"


Comments
Post a Comment